Preparing the hives for winter
- FEED
We started feeding them sugar syrup (in a 2-to-1 sugar to water ratio) on Sept 13, about a week after taking the honey. This continued until basically just a few days ago. Until the end of October this was pretty heavy feeding. Those colonies consumed a lot of syrup! I wish I kept records on how much sugar or how many gallons of syrup we went through. I used top feeders from Mann Lake, which are basically the dual-trough plastic insert feeder into a shallow super box like is pictured here.
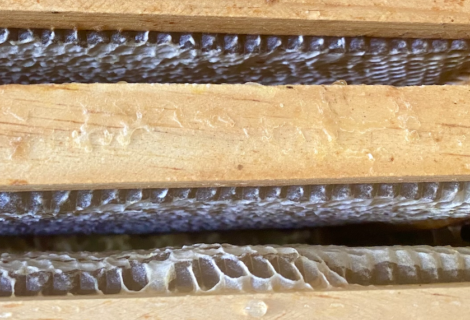
This type of feeder makes it a snap to refill. My dad would mix up about 4 or 5 gallons at a time and then refill about a gallon in each feeder – often per day. It was generally dry the next day and the bees were massed under the screen of the feeder clamoring for more. Until this year, I had never heard a colony make such noise up near the feeder – such a loud clicking and humming when we removed the cover on a couple of the hives for refilling with syrup. One thing is that after several refills, the crystallized syrup at the bottom of the feeder would start to build up like is shown below and it would need to be cleaned out.
 On a couple of the feeders, some of the bees would manage to get into the syrup reservoirs, presumably by pushing through the wire mesh. I’m not sure how they accomplished it, but it wasn’t a showstopper. We didn’t have too many drown.
2. MITE TREATMENT
I debated about this quite a bit. I had decided that if I was going to treat, then I would use oxalic acid – dribble method. It is inexpensive, reported to be pretty effective and just recently approved for use in the U.S. On the other hand, the colonies seemed quite strong, and I wasn’t keen on breaking apart all the boxes and risk to the queen that go along with that, plus the treatment risk to the bees. Whenever I could get down to the bee yard, I only had a couple hours of day light, and I didn’t take the time to try doing a mite count before deciding on treatment. Next year, that is something I’d like to try doing. In the end, I went ahead with the oxalic acid treatment. I ordered the crystals (reported 98 % pure) from an Amazon partner. What I got in the mail was sodium per-carbonate…finally got that corrected and they sent me the right stuff. I mixed it up somewhere between the “weak” and “medium” concentration per the tables given on scientificbeeking.com. Not a great data point I know, but you have to go with what you are comfortable with, and the data points are secondary. Most beekeepers probably do medium strength. Add to this, the fact that a later email indicated that what I had was oxalic acid dihydrate, and the uncertainty is even more. Because my understanding is the dihydrate is 78% pure, or wood bleach concentration. If that’s the case, then what I applied was less than the “weak” strength.
If I have colonies that come through the winter, then I’ll need to decide whether to treat them again in the spring. I’ll make some observations at that point and maybe a mite count before deciding that. For the fall here, I treated around October 18. It was quite a warm day, and I did not fire up the smoker to begin with. That turned out to be a mistake. The bees started pouring out of the boxes before we could get the hives back together. With all the burr comb they were building between the boxes, I’m afraid we crushed a number of bees that had piled out onto the burr comb. So after the second hive, my dad started the smoker and we were able to avoid that problem. We used a plastic container with an extended spout – basically a restaurant style ketchup container – to apply the treatment, about 50 or 55 milliliters per hive.
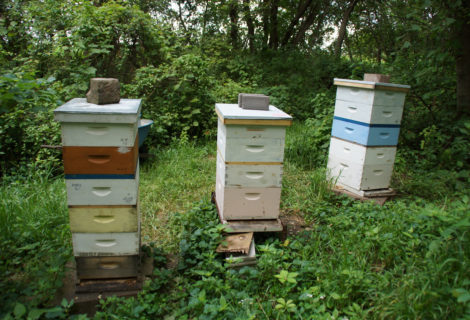
The hive configurations going into winter are as follows: 2 hives have four medium boxes, 1 hive with three mediums, 1 hive with one deep and two mediums, and the smallest with one deep and one medium. Each of the boxes were pretty heavy by Oct 18 and they continued to take syrup feed for some time after that. At the time of honey harvest, I did not expect the small hive to be going into winter. I had not seen much in the way of nectar storage or wax building since July, and there was less activity than the other hives. But when checked later, they did appear to have brood, a decent population, and they were taking the syrup.
As far as the treatment, there is an alternative method with oxalic acid where you use a vaporizer in a closed off hive. This would have the benefit of not needing to break apart all the boxes when treating. “Might” be something I try in the future.
3. BRAMBLE BOXES
When you remove the top feeder from your hives, there are different types of top boxes you can replace it with as an “aid” to winterization. Sometimes called quilt boxes, winter feeder boxes, or ventilation boxes…these can help provide a buffer space at the top of the hive stack, help wick moisture out of the colony and/or help absorb moisture. I like the idea of the “bramble” winter top feeder box that The Bee Shed tried last year and are selling the wooden-ware portion of it this season. I had my dad make a variation of it with a thicker & wider spaced plastic mesh on the bottom, and four of them without the extra framing for a built-in top-entrance. Essentially this box is about 3 inches high and it has 3 compartments, each two inches high. The two side compartments are for holding wood chips and the middle compartment allows for feeding the bees through the mesh.
The two side compartments we filled with cedar wood chips and above all 3 compartments there is space for a 1-inch thick insulation board. Several small holes are drilled from the outside into the cedar chip compartments to help with ventilation. Above the insulation board we put a layer of cardboard and then the outer telescoping cover. In the middle feeder compartment we recently put part of a pollen patty for each of the 5 hives, so we’ve started our “winter” feeding, and they are eating on it. Pretty cool!
Usage of the top box is something we are in the process of adjusting as we go along. The main threat to a strong, healthy colony in the winter is that of excess moisture. There are many thousands of bees in each hive and their respiration produces a lot of water vapor. Honeybees do not hibernate. They are cluster together in a spherical configuration and are very active in the sense that they “shiver” to generate a considerable amount of heat. All that shivering means a lot of respiration. That water vapor will rise to the top of the hive, condense, and then drip back on the bees, and that cold dripping water will eventually kill the cluster from the outside in. Additionally, the water can pool at the bottom of the hive, freeze, and block the front entrance. The excess moisture needs to be vented, absorbed, or both.
With the mild November that we’ve had so far, what we’ve found is that leaving the insulation board in the hive did not permit enough venting, even with the drilled top-entrance plus extra ventilation holes. Water would condense on the insulation board and then drip onto the wood chips. Fortunately, the chips could handle most of the moisture by the time my dad caught the situation. He removed the insulation board, and propped up the telescoping cover on some wood chips that were placed on the top edges of the bramble box to allow more venting. With this configuration, there hasn’t been a build-up of too much moisture, but still some hives have noticeable moisture. I’m considering adding more cardboard or a slab of absorbent particle board to help deal with the moisture. It may be that the foam insulation board is not helpful or needed in this type of configuration.
4. SHRINK-WRAP
This is a bit of an experiment, certainly. My dad has roles of leftover shrink wrap from his prior job, so we went around the hive bodies with that a few times. Some people use tar paper or something of that nature. The idea is to stop drafts from getting in the hive through spaces between the supers, especially when they’ve been broken apart recently (e.g. mite treatment). The jury is still out on shrink-wrap. First, it seems like a strong colony is pretty adept at sealing off the boxes with propolis, even in October. Second, we’ve observed moisture condensing on the inside of the clear wrap. It may not be a problem, but I’d prefer not to have that moisture kept next to the hive. We punched a hole in the shrink-wrap around the top entrance for each hive and used silicone caulk around the entrance so that the bees would not get themselves stuck behind the shrink-wrap.
5. STRAW
My dad cut and baled 50 bales of straw from excess pompous grass in the vicinity of the hives, so these provided a logical insulation material to use. We set them up in a horseshoe configuration around each of the hives, leaving front open.
These hives won’t get much sun in the winter, but I think having them on the edge of the woods with the straw bales will give them a nice protected environment. In the picture above, the feeders were left out for the bees to clean up after putting on the bramble boxes and other weatherization activities. This was taken on Nov 1. Since that time until a few days ago, my dad had continued to place some amount of syrup in the feeders on the ground (not enough for the bees to drown in) and they have eaten it up.
6. MISCELLANEOUS
- Put entrance reducers on the hive to the smallest setting. These are custom built reducers with an opening slightly larger than a standard reducer small entrance. However, I still wonder if it is large enough to get adequate air flow, given the straw and shrink-wrap.
- Drilled screws/nails into the entrances to prevent any small mouse from entering the hives. This seemed similar than inserting a mouse guard behind the reducers.
- Drilled top entrances. This was mentioned above already.
- Pollen patty feeding


Recent Comments